UI Tool Kit is the newly introduced user interface version in the latest Unity Engine. It is designed to enhance performance and ensure long-term improvements. It can also accommodate advanced use cases involving HTML and CSS. The Unity UI caters to game user interfaces with a moderate complexity. It minimizes the need for extensive updates across user interfaces, game projects, or game versions. The UI Tool Kit enhances the experience over time. This happens as you update the game project version in Unity. It offers significant advantages over its predecessor in usability. It also brings improvements and version compatibility. Unlike Unity UI, which is managed through the package manager, the UI Tool Kit is directly integrated with the Unity Engine. It is part of the engine version itself. It is not managed through the package manager. This integration guarantees that it will also be updated alongside the latest available Unity versions.
The UI Tool Kit supports HTML. It is an excellent choice for web developers looking to integrate this language. This tool kit is readily available for use. Additionally, CSS is utilized in the editor for naming and renaming user interface objects. These UI objects can be referenced within C# scripting. This occurs during programming on the job system. It can also occur on the Mono Behaviour main thread. Register the object names during initialization. This allows you to access them in C# scripting. You can call functions to change string text for labels displayed on screen. HTML can also facilitate the input for various objects like buttons, inputs, text fields, and toggles in scripts. For manual actions, you can drag objects within the UI Tool Kit editor to the desired transform flex. Web developers will find the scripting aspect more familiar.
At the moment I’m working with the UI Toolkit. The tools are still in early access. This means Unity developers will need to update their game projects following any new updates to the Unity game engine. The UI Toolkit is relatively new. It requires further enhancements. Yet, it holds promise for the future of the Unity game engine, especially beyond just the Unity user interface. There are several issues with the UI Toolkit. These issues affect how it interacts with the Unity user interface. This is particularly evident in the Casual Fluffy Farm game. The dialog for the fluffy character necessitates game object instantiation in the world and requires updating its world position accordingly. This challenge has made me realize something important. Utilizing the Unity user interface alongside the UI Toolkit is crucial for effectively addressing these issues. I’m still uncertain about the role of the UI Toolkit, like updating label text. I do not know how it should reflect changes in world position during development. Additionally, the UI Toolkit cannot be destroyed post-instantiation unless the Unity user interface is employed. Let us look at the screenshots. They demonstrate the User Interface from both the previous and the new Casual Fluffy Farm game. I have developed these interfaces.


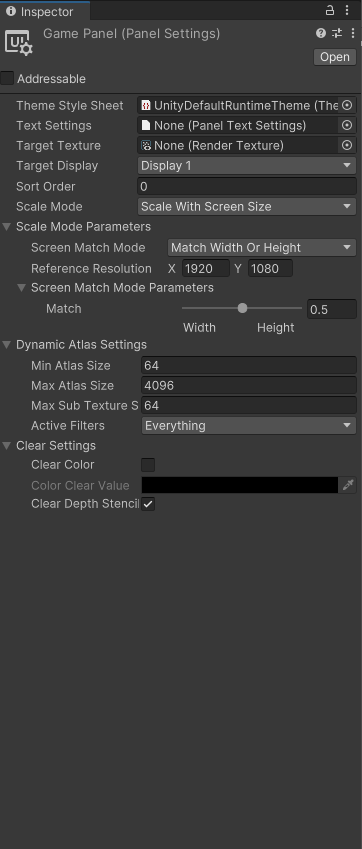
Screenshot 1 displays the canvas scaler for the user interface in the main menu, allowing for screen resizing to different dimensions. At the top is the Unity user interface, while the bottom showcases the User Interface Tool Kit. Many functions are quite comparable between the two, particularly concerning reference resolution and scale mode. To integrate the User Interface Tool Kit, you must include the UI Document scripts and configure the panel settings, whereas for the Unity user interface, you need to add the canvas scaler along with the canvas.


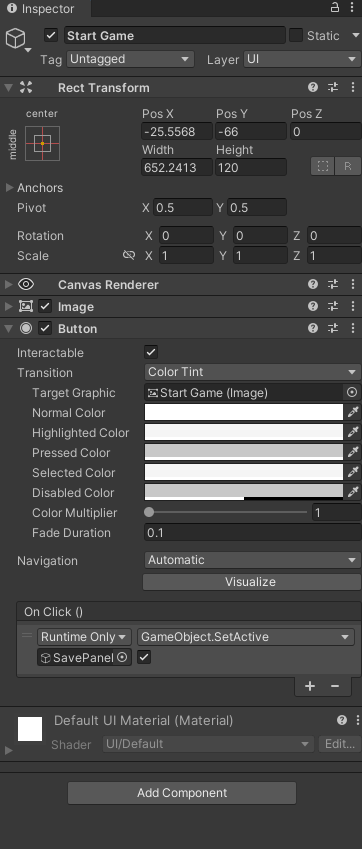
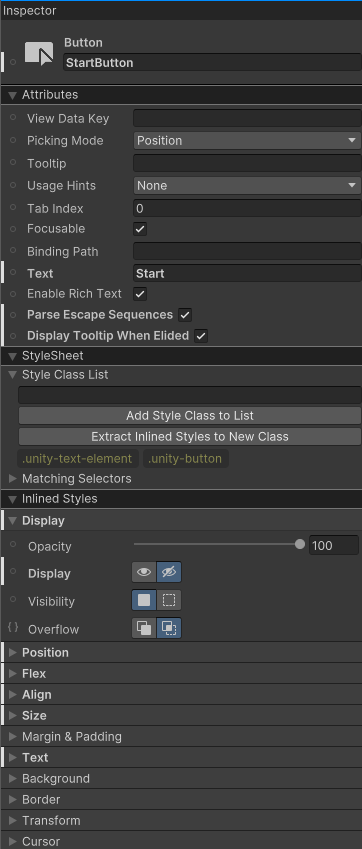
Screenshot 2 displays the user interface buttons for both the UI Toolkit at the bottom and the Unity user interface at the top. To modify the transform of the Unity user interface, utilize the Rect Transform by adjusting the position, rotation, and scale within the hierarchy. The button interface can be configured either manually or through scripts to trigger an event when pressed. You can add an image to the button by selecting a specific sprite. The bottom image illustrates the UI Toolkit, which features attributes that allow for text manipulation on the button. The stylesheet uses CSS syntax, where you can specify the name of the hierarchy button object to be referenced in C# scripting, such as enabling or disabling the object. The position setting allows for transforming the location on the screen, while size adjusts the scaling of the user interface, and background enables the insertion of an image for the button. The UI Toolkit functions similarly, particularly the button, when compared to the Unity user interface.


The screenshot 3 showcases an input field that operates similarly to the one in screenshot 2 for transform and image functions. The Unity user interface’s input field features settings and events for changed values. The UI Toolkit input field serves as a text field where any string can be entered for use with C# scripting.


The screenshot 4 showcases the slider for the Unity User Interface and UI Toolkit. To implement the Unity User Interface, you’ll need to attach the Slider component to the game object. The slider’s transformation functions similarly to that in screenshot 2. It can trigger an event whenever its value changes, such as modifying the sound variable based on the current value. Likewise, in the UI Toolkit, the slider can register an event in C# scripting to perform actions related to the audio system according to the updated slider value.


The screenshot 5 showcases the Unity user interface and UI toolkit, which share a transformation similarity previously detailed in screenshot 2. Notably, the toggle serves as a component unique to the Unity user interface, allowing it to be added to a game object by locating the toggle component through search. The toggle functions similarly to other event functions, performing actions after an event is registered. This behavior is also mirrored in the UI toolkit, where a toggle can be activated or deactivated by adjusting its boolean value in the inspector, as displayed in screenshot 5.
Additional Overview of Using UI Tool Kit in Unity Game Engine


- The screenshot 1 of the picture contain information of casual fluffy farm interface that has different kind of functionality such as dragging, dismember, sensor, buildings, splatter, cleaning, business, and shop. Using the UI Tool kit as you can see in the left side panel there is variety of options especially top left corner has different kinds of USS(Unity Style Sheets).
- For every user interface in the UI Tool kit especially in the right bottom corner contains different of visual elements that has different variety like button, text input, and others. Inside the visual elements are functionality to called certain functions and event for those things like enabling the elements and use those as reference to be called in the USS after inputing their uss name in the placeholder text.
- To add certain visual elements is to drag the selected interface into the empty column where you can cutomize their position, flex, images, and other options. To make it suits like old casual fluffy farm just tweak the settings which have a simillarity with the unity user interface.
- The screenshot 2 of the ui tool kit pause menu show different variety of button that can be interact with the player on game. The visual element on the has the option to be enable or disable after pressing the pause button to hide the interface from view and pause on the game. To use the ui tool kit effectively the USS must be customize by adding certain name in the hierarchy and called the name in the c# scripts after initialize the variable.
- Screenshot 3 displays the options menu for Casual Fluffy Farm, where players can adjust various sounds and music settings within the game. The interface incorporates programming elements that allow users to manage volume levels and attenuation values by manipulating sliders from the UI toolkit. Players can set both the maximum and minimum values as desired. The toggle button enables players to activate or deactivate sound options, giving them the flexibility to choose whether to enable audio, particularly in coding scenarios. Additionally, it is necessary to use USS to customize and invoke specific functions in the game by assigning names to USS.
- The screenshot 4 displays the building menu for Casual Fluffy Farm, triggered when the player presses the icon button in the game. The selected building prefab isn’t visible initially, as it is only initialized and called during the game after the specified sprites for the building are loaded. Once this process is complete, the sprites will be available for the player to click on and construct within the game. This functionality also requires the use of USS (Unity Style Sheet) to arrange the building sprites in a scrollable vertical order within the container.
- Screenshot 5 displays the shop menu interface, which includes food and item tabs. During game initialization, the list items for two of these tabs will auto-populate based on the system’s entity base. Utilizing the addressable system package, selected items can be loaded and used in the game by choosing these items like food and other items. Currently, there are no costs associated with buying or selling these items within the game. The use of the USS (Unity Style Sheet) is evident when adding these populated items to the scroll container.
- The screenshot 6 displays a sensor menu for a casual fluffy game. When a player presses the menu icon in the interface and selects a fluffy character, it shows their current statistics. Players can also customize the interface by selecting any empty text areas for editing within the game. The input text for the UI toolkit must utilize the USS (Unity Style Sheet) for proper functionality in the game. Additionally, text and visual elements are employed to display current text and images representing the emotions of the fluffy characters.
- The screenshot 7 displays a fluffy business menu user interface designed for use with the UI Tool kit. Additionally, this interface incorporates a custom button that must be instantiated in the game for the fluffy button functionality. The UI tool kit button will spawn automatically after the fluffy is stored. The appearance of the UI tool kit button must be adjusted to match the current color of the fluffy, ensuring that the buttons resemble the original color of the selected fluffy. The spawn button is used to spawn the selected fluffy within the business.
- Screenshot 8 showcases the main menu interface for the casual fluffy farm, utilizing the UI Tool Kit. Here, the background and button images are used to manipulate the visuals with one another. Additionally, this text can be altered along with other elements using the UI Tool Kit.
- The input text UI toolkit is utilized in screenshot 9, where it is used for saving game profiles and loading specific profile names later. The input text can be adjusted in the inspector, including aspects like flex, position, and images.
- Screenshot 10 features a casual and fluffy game interface designed for loading a game with a specific profile name. If there are no saved games stored, the interface will remain empty. The button will automatically appear in the UI toolkit only when save data is available, allowing players to interact with it to load their game.
Available for freelance projects on Fiverr.

