2D Game Project Recap
Last week I explained how to set up the Unity game engine. This is a game project using the Windows operating system(OS). There are multiple iterations for a new user at the beginner level. Especially, how to install their Unity version from the main hub, which is Unity Hub. Unity Hub provides the essentials for the user to sign up first with a Unity account. Once signed up, they have the ability to access the download site to choose their own operating system. After doing so, the user needs to install the downloaded version of Unity Hub. After installing, they need to navigate the interface to download the Unity version, install it, and create a new Project. Next, I will explain how to navigate the 2d game scene and hierarchy in the Unity game engine 6 version.
Tab Hierarchy
First, I want to explain the Hierarchy tab in the Unity game engine 6 version. This is the things are the places where most game objects are spawned in the game and in the editor. From the game object in the hierarchy, there is the inspector, where the user can see the game object’s functionality. Game objects behave according to their own functionality when the player presses the Play button. This is shown in the game scene. First of all, what is important in the hierarchy is the camera. The player can see the currently spawned game object that is being spawned in the scene. While those being rendered by the camera.

Camera Component
In this case, the camera also keeps track of other things. Like the game object rendering, such as colour and shader. It shows their current graphics setup to the player by rendering it. On top of that, the camera scripts in the game object control different types of things. The player can see it on the screen below. The projection, which is an orthographic type, can switch to perspective mode. This switch changes the camera view in the game scene. The size sets how much the camera width and height scale from the last position in the scene. This also applies to the new position, and the game scenes show an updated view. Near and far mainly affect 3D game scenes only. This determines how the scene uses the Z-position axis on the transform script of the game object.

Rendering Settings
In the camera scripts, the developer sets up the graphics quality range from low to high. The user can control this by choosing the renderer type method. Such as anti-aliasing, stop NaNs, dithering, render shadows, priority, opaque texture, depth texture, culling mask, and occlusion culling. When you create a new game project with 2d settings. Unity sets the main camera’s script to use Renderer 2D by default. In my opinion, this rendering functionality works best in 3D game development, especially when working with shaders and materials.
Universal Pipeline
In this tutorial, you will spend most of your time using sprites and materials to configure game objects in the game scenes and in the editor. The post does not cover rendering for this type, so you must add any new rendering capabilities yourself, such as Universal Render Pipeline, through the Package Manager for the game project. I usually see developers use these tools mainly in 3D games, where visual quality and graphics drive the gameplay instead of classic games that rely on older mechanics. Unity provides these camera scripts in its packages, and you can find more information by clicking the small white circle icon in the top right, which opens the relevant Unity documentation page in your browser.
Low Graphics Better
Using rendering actually produces much better graphics, creates high performance overhead, and forces the graphics card to use more processing units. That is also the reason I usually skip this section, because it makes low-spec machines run with difficulty, especially when the setup tools are set higher. Otherwise, you can see in the image below what kind of stack, environment, and output you want so you can configure your game project properly. I had to move this topic into the next sections of the game scene since I also never went into much detail on those points.
What Suffices For Me?
For me, creating 2d game does not involve the use of graphics that much since it just involves the limited graphics that I needed for the game, unless you are creating more high-quality graphics in 2d game that involve the use of manipulation of the rendering system.
Light 2D Component
I actually don’t know much about the global light 2D system because I have never used it much in my 2D Unity game project. I use it to add shadows to the game scene, so they appear clearly during actual gameplay. In the image, you can see the Global Light 2D that Unity Game Engine 6 automatically adds after you create a 2D game project. You can change the light type from global to other options and test different setups until you get the exact feel you want for your 2D game. By default, the light 2D system uses white, but you can adjust the colour and switch it to any colour you want for your game. The intensity setting controls how strongly your light affects other game objects.
Sorting Layer For Light 2D
Those light 2d also can be sorted with the target sorting layer that you can add based on the available options. I rarely use blending, but it is one of the tools that effectively makes your game scene more beautiful and astonishing to the viewer.

Create Game Object With Sprite Component
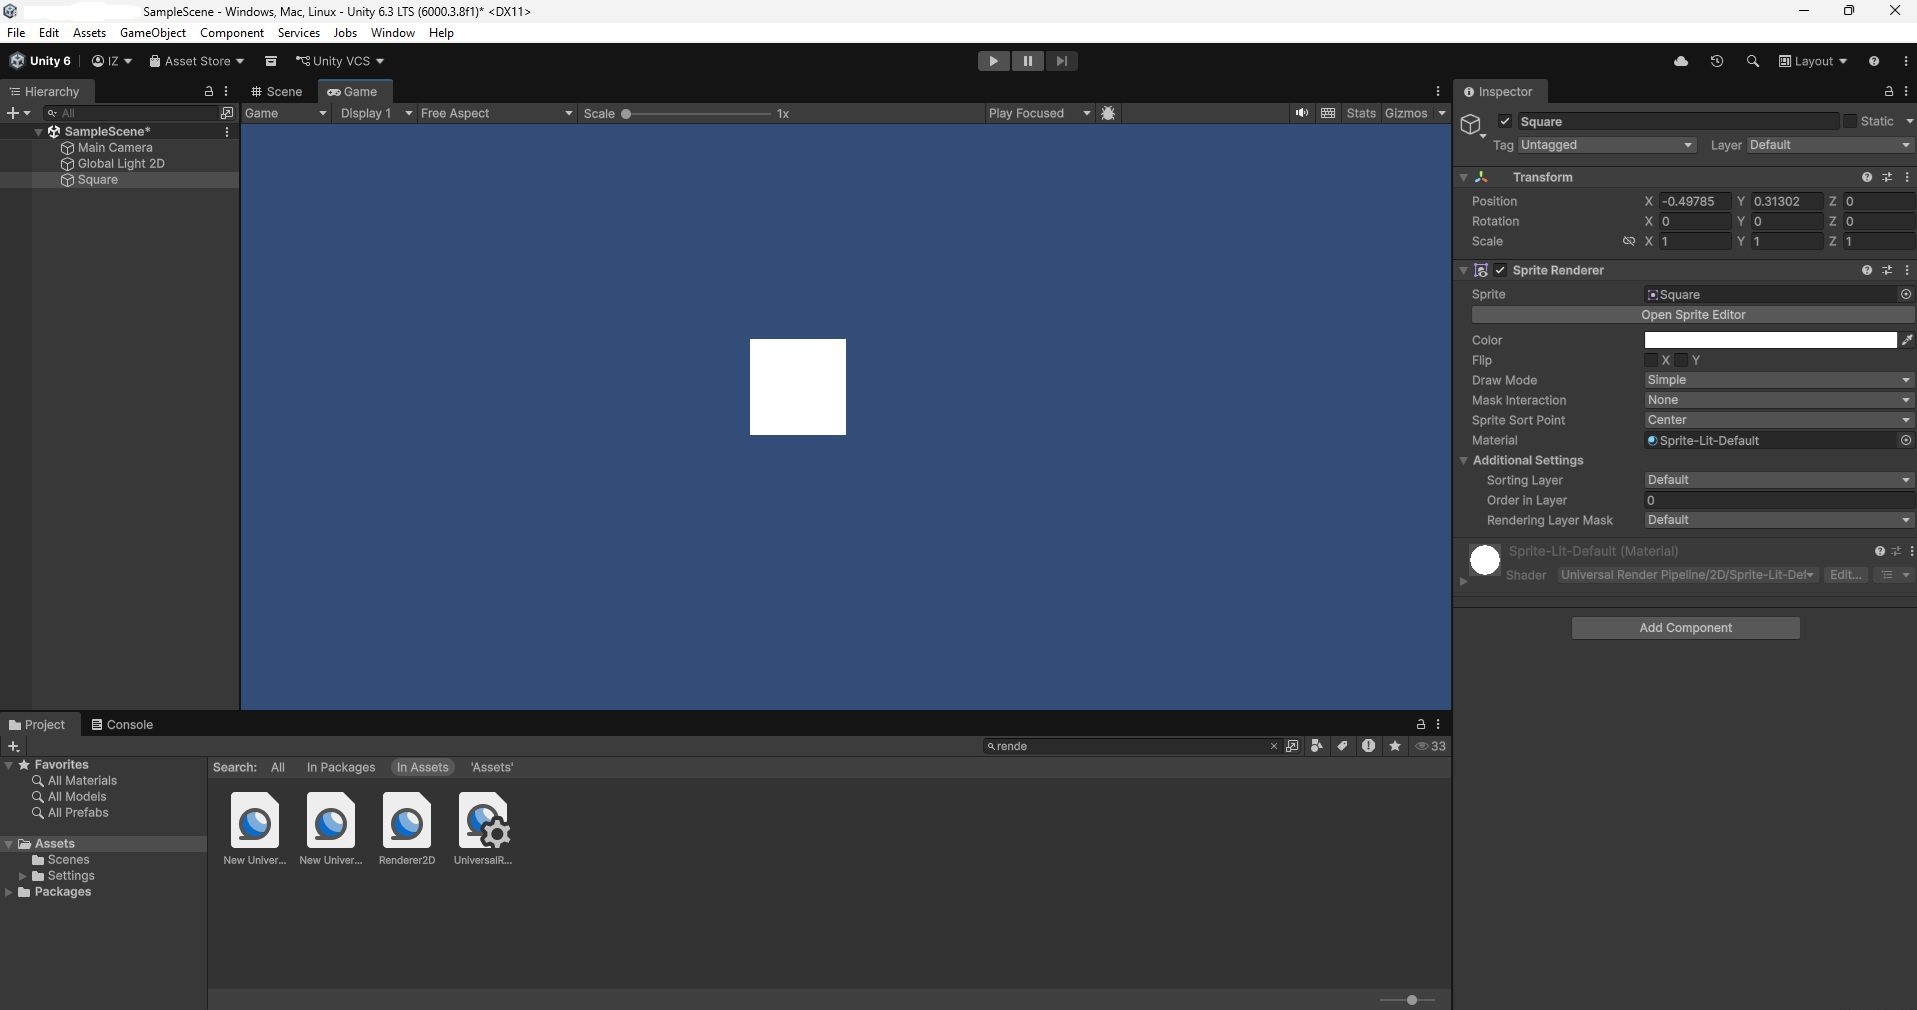
Next is the step of how to create a game object in the hierarchy. This includes their component of the game object, like Transform and Sprite for 2d component. To create the game object in the hierarchy, just right-click on the game object and choose the 2d object. That brings additional options to choose from, like triangle, square, circle, and others. By clicking on the square, for example will create a game object square for you. In the hierarchy, it includes an attached Sprite Renderer component. As you can see in the image below, there is a Sprite Renderer component. That is where you edit its sprite to change into your own sprite in the editor. You can also edit the sprite using the sprite editor to slice the sprite.
Sprite Renderer Component
The colour system allows you to choose the colour that you want for the game object in case there is no colour for it. The flip in the component inspector is to change the side of the axis in the y and x position that directs the game object’s facing. The draw mode is to select either simple, sliced, or tiled in case you want the game object to look half or in the tile mode of the game scene. The mask interaction is the visibility of the renderer that you can choose from when interacting with the UI(interface) that contains mask behaviour to either render it visible inside the mask or visible outside the mask.
More On Variable
Sprite sort point is the current position of the sprite, in world position and rotation. It is the main point for how the transform component manipulates the sprite. The material, however, is the default one the renderer uses in front of the game scenes, providing the visual effect. The additional settings control where the sprite is visible in front of other sprites, especially in 2D view where some sprites overlap with others. The sorting layer is the current layer for that sprite; if another similar sprite appears in front, the order in the layer setting decides which one appears on top. Zero means behind higher numbers, such as one. The rendering layer mask controls visibility with other rendering layers that a user can configure and set up.

Conclusion And Pressing the Play Button in a 2D Game Scene
Finally, this game scene will look like this after creating the square game object and their game play after pressing the Play button. Congratulations, you have now created your first game object in the Unity game project. Thank you for reading, and I will soon write more about 2d unity game tutorial sections. Insya Allah.


Leave a Reply