Unity: Input Highlights
Unity physics and collision will be what we’re covering, Insha’Allah. This topic appears within the Unity game engine system. Previously, I mentioned the movement of game objects. It explains how to move game objects using the legacy input system of Unity. By using scripts, MonoBehaviour, and the project settings, I successfully achieved the result. The game object square moved using only horizontal and vertical input, where those inputs stay at their default values. Most games usually use the keyboard for movement: W, A, S, and D. Another key set that supports this movement is the arrow keys on the right panel of the keyboard.
A Look Back at the Previous Week
Previously, I mentioned covering Unity’s new input system. I used it to move the game object by combining the new input system with the old one, so both systems work together. Today, I will add the new input system, physics, and collision. Before that, I already created another tutorial on how to download the Unity game engine. I also explained and taught how to create a project, use the Inspector, set up the game scene, manage the hierarchy, and navigate the Unity interface. After that, we covered how to create game objects, especially the background image, camera, and SpriteRenderer. Next, you can see how I add the background image and change its colour in the Inspector.
Adding the Unity New Input System
In this game project, I changed the current active input handling that had previously used either the old input or both systems. You can see this in the image below, especially in the project settings of the Unity game engine. Usually, when you switch that setting to the new input, the Unity editor prompts you to restart the game engine. This requires you to close the Unity software, and then the system automatically restarts it with the new input enabled. After you change the input handling and restart, you can no longer use the old input system because Unity throws an error. To fix those errors, you must update the scripts, configure the new Input System package, and add an input component in the Inspector.


Commented Out Old Input System
For that, let’s open up the previous square movement script where Visual Studio will automatically start. First, in the last script, we used the old input system script where those game objects move. Now, we need to comment out the last script so that it’s no longer functioning with the new input system package. Select the current square game object in the hierarchy to add a component. Select the component at the top or use Add Component, where there are different options. In the list, find the option Input, where there is the sub options that contain some of the player input and the Player Input Manager. Select the Player Input option to add the component to the Square game object.

Add New Input System
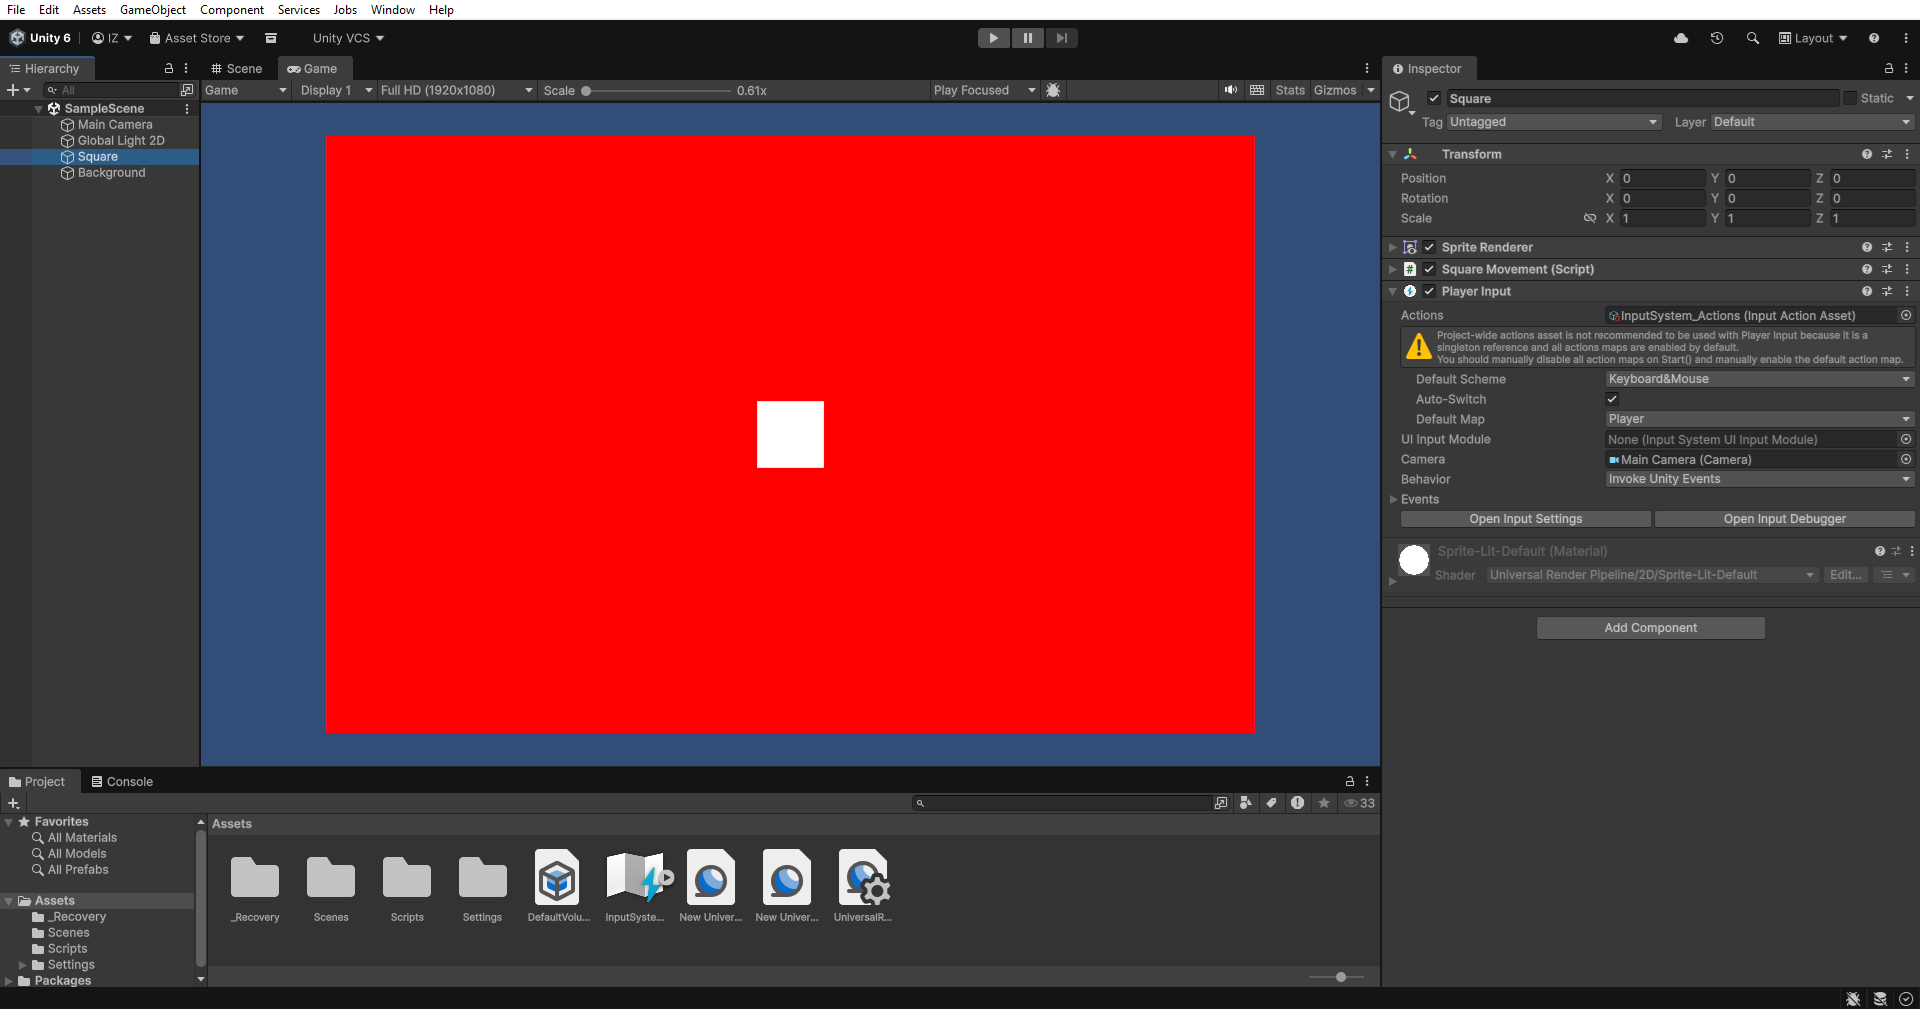
Once you add the Player Input to the game object, it shows up in the game object inspector. When you add the component, the Actions variable references a ScriptableObject. The new input system package automatically creates those Scriptable Objects. Those input system actions define the player and UI (user interface) interactions. The scheme defaults to Any. You can also configure other variables like auto switch, default map, UI input module, camera, and behaviour. All of these variables are important, and scripts can access them.

Invoke Unity Events
Now, to make the changes for the variable to work with the Square game object, set the default scheme to KeyboardAndMouse. Eventually, set the variable auto switch to true, but in my opinion it is better to set it to false. The game project does not need auto-switching because it targets platforms that do not require it. So, by setting it to false, you make it more usable since this variable does not need that feature. Next, set the default map to Player instead of UI (User Interface). Now leave the UI Input Module and Camera variables unassigned. For the final variable, Behaviour, set it to Invoke Unity Events.

Set up Player Input Actions Scriptable Object
The most important part of this component is the variable Invoke Unity Events. The events listed are Player and UI from the Scriptable Object of input system actions once you open it. You can use this automatically created setup with the new Input System package and the scripts. If you cannot see the Player and UI events, use the Actions variable to deselect and then reselect Configure Input System Actions. Inside the Events, especially the Player action, each callback context uses a different setup. The script function uses this setup when you call it from the inspector. To do that, press the plus symbol to add the Move callback context.

Adding the Required Script
As I previously said, the Move callback context comes with the new Input System package. That is, with the Input System actions of the Scriptable Object. Now, in the scripts it to modify them to remove the previous old Input System package. This is because the system can no longer be used with the new Input System package. In the scripts, find the new line to add a new function or method in the square movement script. Use the name OnMove and add the needed parameter of input action dot callback context to it. Inside the function, make a Vector2 variable of vector 2 to read the value from the context parameter. Now use transform. Translate to add movement based on the variable input vector. See the image below of how the code works, like it previously did with the old Input System package.

Selecting Function
Now, in the Inspector of the square game object, which is located on the Player Input component. You will need to add the square game object to the Move Callback Context. This will fill the None for the square with the No Function name. Change that to add a function by selecting No Function to Square Movement. On the sub of Square Movement, select the function previously created in the scripts. It should appear in the options other wise you will need to save Visual Studio. Let it compile in Unity Game Engine 6 to be added. Below is the Configure Added function OnMove from the scripts for square movement.

Saving Game Project
Finally, save the project now before pressing the Play button in the Unity Editor. This will make sure the square game object is playable in the game scenes. If there is no error being shown in the console, then everything is working correctly. Press the known buttons, usually W, A, S, and D on the left side of the keyboard. The right keyboard can also be used, which is the Left, Up, Right, and Down arrow keys. Pressing the button needs to be tapped instead of holding the button on the keyboard. This will move the game object a little by following the manipulated value in the scripts. The user can also configure those values by making the variable and manipulated in the Inspector.

Conclusion on Using the Unity Input System
In conclusion, now the user can make movement using the new input system package. After configuring all of the steps above usually user should clearly use the new input system package instead of the old one. Also, the user can also and have the option to use both the old and new input system packages. That is a need to change them to the new option, which is available in the project settings. You can see in the image below where I show the option to use both the old and new input system.

I drafted this article from my own perspective and used AI to polish the language.
Concept art (created with generative AI, touched up manually).


Leave a Reply