Collectable Items: 2D Unity Game
Today I planned to post about creating collectable items in the Unity game engine. This collectable item is actually a physics game object that collides with the player. The player controls the game object in the game scene, especially when moving left and right. I have not created the current game object yet. This step requires the user to interact with the Unity game engine. Also, do not forget to add the right component to the collectable game object. So the player can pick it up. Usually, a collectable game object stays in one position, which means it stays static. And it does not move in the game scene, just like the ground game object.
Unity 2D Physics: Recap
In the last post, I actually wrote about adding a 2D physics component to the game object. The 2D physics makes the object controller react to the other game objects in the scene. One of them is the ground, which holds the controller object from falling down because of the gravity effect. Most of the things that I wanted to show are actually the movement. This is the controlled game object using the physics controller. Instead of moving using local transform, it actually moves using only the Rigidbody 2D transform position. I did manage to make a move using the new Input System and the legacy system.
Collectable Items: Opening The Last Game Project
It has actually been some time since I made my last tutorial. And I did not really open the Unity game project. Now head to the Unity Hub to find the last project you created. Or create a new project if you have not yet started. Select the project that you created before and press the project. Now you will need to wait for a few seconds while Unity loads the game project on Windows. After that, the Unity game project will pop out in the Windows tabs. Now head to the Hierarchy section to prepare for adding the new collectable item to the game scene.

Collectable Item: Create The Game Object
As mentioned in the previous tutorial, I explained how to create the GameObject in Unity using different kinds of steps. You either use the Hierarchy tab by right-clicking. Or press the plus symbol icon to call the function of the sub-hierarchy. This action then gives you new options that offer a variety of actions, such as creating a new GameObject. For a shortcut, you can also press CTRL + SHIFT + N, which automatically creates the GameObject for you. Another way is to press GameObject in the top tab, which shows the sub-options listed like right-clicking in the Hierarchy. Once you create it, you just need to rename the GameObject to the collectable item, such as “Coin.”
Adding the Sprite Component
To add the Sprite component, select the coin game object in the hierarchy and, in the inspector, click Add Component. Now you realise that the Sprite component actually does not attach any sprite to the game object, but it does add the component. You just need to assign a custom sprite to this component by selecting the None sprite to access other game assets, using the Unity directory that comes with sprites such as Square and Knob. Choose the circle sprite, which is Knob, so that you replace the None sprite with the new one, which is Knob. Now you can see the sprite on the screen, but it appears smaller than the square game object controller.
Rescaling and Repositioning Coin GameObject
To fix those issues, especially with the smaller coin size, after assigning the sprite’s Knob, go to the Transform of the coin GameObject to see the scaling of those coins. For me, I had to change the value from one to five for both the X and Y, which enlarged those coins to be almost similar to the square GameObject. After that, you have to reposition the coin GameObject so that it does not interact with the square GameObject. I adjusted the position of the coin to the value of four on the X and Y axis and negative three point five. That makes the coin on the ground side instead of floating in the air in the gameplay scene.

Collectable Items: Adding the Collider and Script
The next step is to add the collider, similar to how you add the Sprite component in the Inspector field. Press Add Component on the coin GameObject to find the specific Physics 2D collider. You can also select the component from the top tab while you have the coin GameObject selected to bring up the different 2D Physics colliders. For this GameObject, I choose Circle 2D Collider as the best option because it automatically resizes with the sprite of the knob. I also select the Is Trigger option to signal those objects as a trigger to use in the script later. Now I add the new script to the coin GameObject and rename the script to CoinTrigger. Select the specific folder in Assets for the script and create the script.

Adding MonoBehaviour Function to CoinTrigger Script
Now open the CoinTrigger script on the coin component, which brings up the Visual Studio software that displays the startup scripts. Usually, the startup script will show the MonoBehaviour functions that come with the functions Start and Update. You can actually just ignore both the Start and Update functions since those are not being used yet for the coin trigger script. What matters now is to add the function OnTriggerEnter2D to the script. Using the new Visual Studio, it automatically gives code suggestions using IntelliSense. This actually makes the process of coding much easier if you turn this feature on in Visual Studio.
Inside the OnTriggerEnter2D function
I use the if statement to input my condition, since I need it to check for the trigger object with the coin. After that, I use the given parameter Collider2D collision in the OnTriggerEnter2D function to make this much easier. Then, I use the function parameter with an if statement to check the collider of the player or square game object that I control in the game scene. Now, when the player collides with the coin game object, the game actually destroys it. I call the MonoBehaviour function Destroy with the parameter gameObject to instantly destroy the game object during gameplay.

Adding Tag To The Player Game Object
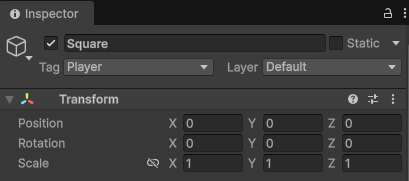
To make the player collide with the coin game object, you need to specify the tag for both. In the Hierarchy, find the Square game object that the user controls during the game. Select that Square game object and check the Tag field in the top left of the Inspector, which Unity sets to Untagged by default. Find Player in the options for Tag; Unity usually creates this tag automatically, but you still need to select it. When the Player tag is not available, use the Add Tag function to add a specifically named tag to the player Square game object. Also, you need to change the name in the script to match the new name.

Subscribe to get access
Read more of this content when you subscribe today.
Conclusion: Collision Trigger on Coin
In conclusion, the coin game object will need specified components such as Physics 2D, which will act as the trigger. Also, its components need to have “Is Trigger” checked so that it will happen during the game events. The script also needs to be added to the coin game object and to call OnTriggerEnter2D. The player tag also needs to be specified in the inspector of the square game object. The script itself also needs to use the same name that has been assigned to the control player tag. Otherwise, it will fail to trigger and perform specific events from that. Let me know what you think in the comment section. Thank you for stopping by and reading this section of the tutorial.
I drafted this article from my own perspective and used AI to polish the language.
Concept art (created with generative AI, touched up manually).


Leave a Reply